A lot of traders spot a cup and handle, mark the breakout, and still lose the trade. The problem usually isn't the pattern. It's poor filtering, weak execution, or risk that doesn't fit the account.
Used properly, cup and handle charts can give you a clean continuation setup with a defined entry, a logical invalidation point, and a measured target. Used casually, they become just another chart shape people force onto noisy price action.
Anatomy of Cup and Handle Charts
The cup and handle was formalized by William J. O'Neil, and major charting guides describe it as a bullish continuation pattern. Fidelity's technical guide describes a rounded cup that often forms over about 1 to 6 months, followed by a handle that typically develops over 1 to 4 weeks, with the buy point triggered when price breaks above resistance on increased volume, as outlined in Fidelity's cup-with-handle guide.
The four parts that matter
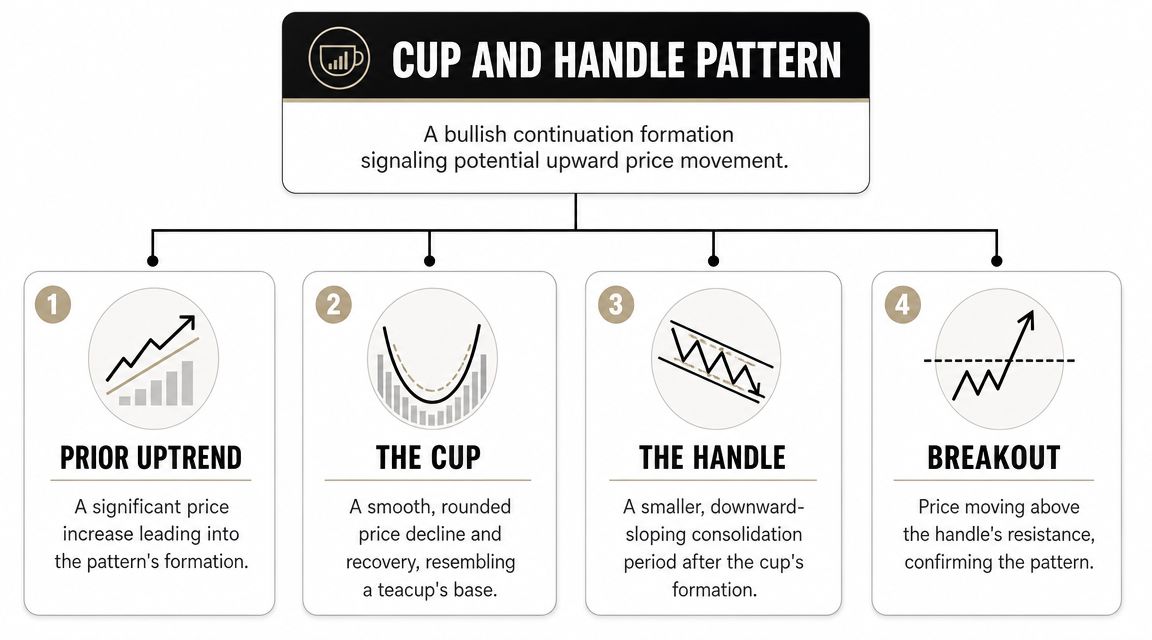
Think of the pattern like a coffee cup viewed from the side.
Prior uptrend
The pattern starts after price has already been moving higher. No prior strength, no continuation pattern.The cup
Price pulls back, stabilizes, and recovers in a rounded U-shape. The rounded base matters because it shows a slower reset in order flow, not a panic drop and snapback.The handle
Near the old highs, price stalls and dips slightly or drifts sideways. This is the final shakeout area. Strong setups usually keep this pullback controlled.The breakout
Price pushes through the rim or handle resistance. That's the point where a trader stops admiring the pattern and starts testing whether buyers can take control.
What traders often misread
A lot of bad trades come from mistaking any rounded recovery for a valid setup.
Here's the practical filter:
- A V-bottom isn't the same pattern. Sharp reversals can move hard, but they don't show the same orderly consolidation.
- A handle near the middle of the cup is weak. The handle should form near the upper part of the structure, not deep inside it.
- Equal or near-equal rims matter. If the left and right sides of the cup don't align reasonably well, the resistance level becomes less clear.
Practical rule: If you can't point to the prior trend, the rounded cup, the shallow handle, and the exact breakout line in a few seconds, it probably isn't clean enough to trade.
Why this pattern keeps showing up
The structure reflects a simple sequence. Early buyers take profits, price cools off, dip buyers rebuild the right side, and late sellers get cleared during the handle. If demand still exists, price breaks through resistance.
That's why traders use it across stocks, FX, crypto, and index CFDs. The market changes, but crowd behavior doesn't change much. If you want a broader grounding in pattern reading on currency charts, this guide to Forex chart patterns is a useful companion.
Precise Rules for Identifying a Valid Pattern
Most failed cup and handle trades were flawed before the entry candle printed. The chart looked close enough, so the trader filled in the blanks. That's avoidable if you treat the pattern like a checklist instead of a vibe.
Non-negotiable structure rules
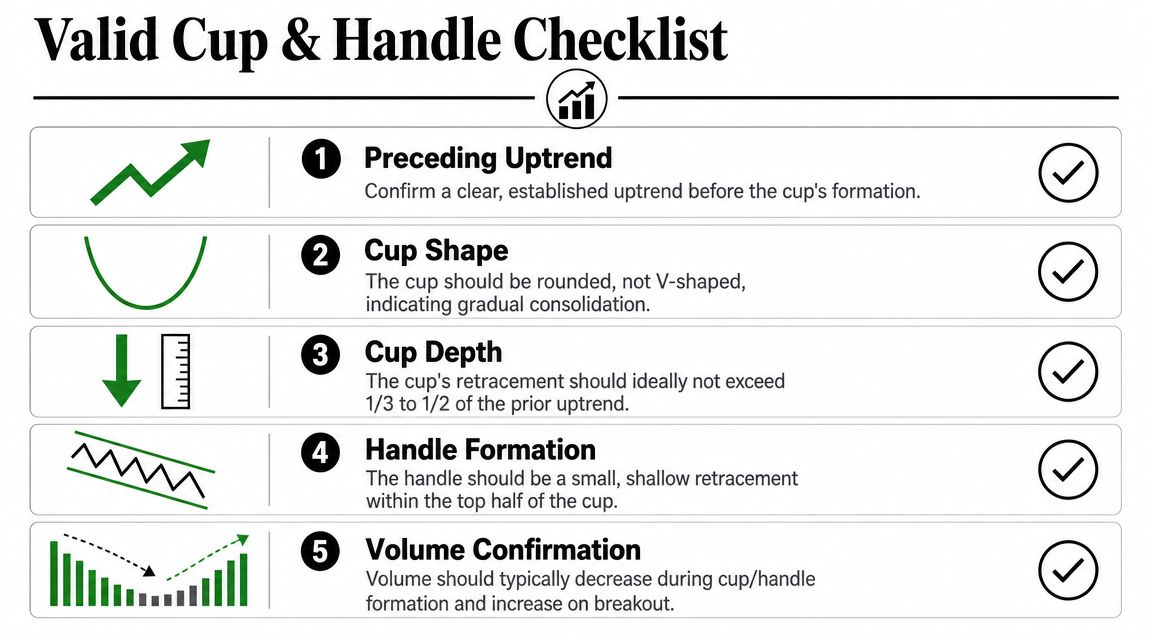
Dukascopy's technical guidelines say the cup should be a rounded U-shape, not a sharp V, the rims should sit near the same level, and the handle should not exceed one-third of the cup's depth, as described in Dukascopy's cup-and-handle pattern rules.
That one-third rule matters more than people think. A deep handle tells you sellers still have too much control near resistance.
Use this checklist before you even think about an entry:
Clear trend first
The pattern should appear after a visible advance. If price has been chopping sideways for a long stretch, the pattern loses its continuation logic.Rounded cup
The decline and recovery should look smooth. One fast flush down and one fast rip back up is a different trade.Rims near the same level
You want a recognizable resistance area. If the right rim is much lower than the left, buyers haven't fully rebuilt the structure.Shallow handle
The handle should stay controlled and ideally form near the upper portion of the cup.Volume behavior that makes sense
Traders often want to see volume contract through the pattern and expand on the breakout. Weak participation on the breakout lowers the quality of the signal.
A practical pass-fail screen
When I review cup and handle charts, I'm not asking, “Could this work?” I'm asking, “What would make this invalid before I risk capital?”
A quick screen looks like this:
| Check | What you want to see | What usually kills the setup |
|---|---|---|
| Trend context | Existing bullish move | Sideways market with no prior momentum |
| Cup shape | Rounded and stable | Violent V reversal |
| Handle location | Upper part of the cup | Handle forms too low |
| Handle depth | Controlled pullback | Retraces more than one-third of cup depth |
| Breakout quality | Strong close through resistance | Weak poke above resistance |
A shallow, orderly handle usually tells you sellers are being absorbed. A messy, deep handle often tells you the market isn't done correcting.
One tool that helps keep you honest
If you struggle to judge retracements by eye, use a simple charting aid instead of guessing. Traders who want a cleaner way to map pullbacks can review this walkthrough on how to draw Fibonacci retracements. It won't replace pattern rules, but it can stop you from calling a deep pullback “healthy” when it clearly isn't.
How to Build a Complete Cup and Handle Trading Plan
Spotting the pattern is the easy part. The trade only becomes real when you define entry, stop, target, and trade management before the breakout happens.
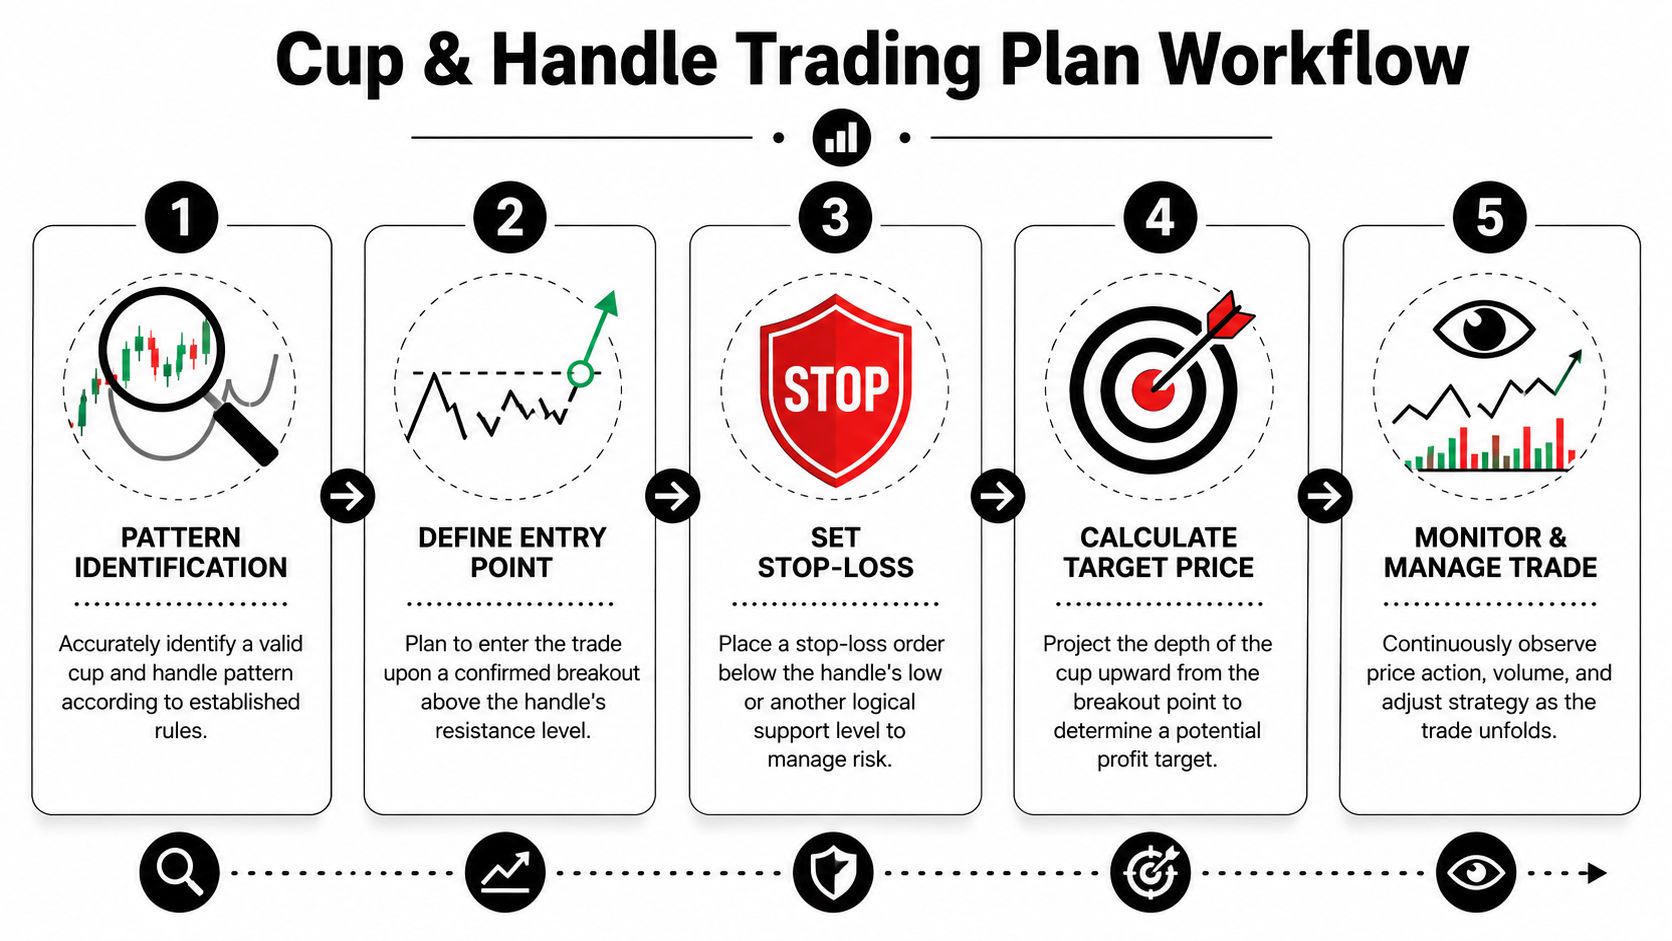
Entry means confirmed strength, not anticipation
The most actionable confirmation signal is a volume spike on the breakout. A high-volume close above the handle's resistance validates trader interest, and a common target method is to measure the cup's depth and add that distance to the breakout level, as explained in Spartan Trading's cup-and-handle breakdown.
That leads to a straightforward execution rule:
Aggressive entry
Enter as price breaks and closes above handle resistance, provided the move has convincing participation.Conservative entry
Wait for the breakout candle to finish, then decide whether the close cleared resistance cleanly.
What usually doesn't work is entering halfway through the handle because “it looks ready.” That turns a breakout trade into a prediction trade.
Stop placement should reflect invalidation
The cleanest stop location is usually below the handle low. If price breaks out and then rolls over enough to lose the handle structure, the idea is no longer intact.
That gives the pattern its real value. You don't need it to predict the future perfectly. You need it to define where you're wrong.
Execution note: A pattern is only useful if it tells you both where to enter and where to exit when the setup fails.
Here's a practical framework:
- Mark handle resistance
- Mark handle low
- Measure the cup depth
- Define the buy trigger only above resistance
- Reject the trade if the stop distance is too large for your risk limit
How to project the target
The classic target method is mechanical. Measure the distance from the cup bottom to the rim, then project that distance from the breakout point.
That target isn't a promise. It's a planning tool.
Use it to answer a simple question before entry: does the projected move justify the risk required by the stop?
What a complete plan looks like in practice
A tradable plan for cup and handle charts should include these elements:
Market and timeframe
For example, an FX pair on the hourly chart, a crypto pair on the 4-hour chart, or an index CFD on the daily chart.Pattern quality
Rounded cup, shallow handle, clean resistance.Entry trigger
Breakout close above the handle's high or resistance area.Invalidation
Stop below the handle low.Objective
Cup-depth projection from the breakout.Management rule
Decide in advance whether you'll hold to target, reduce on the first expansion leg, or trail behind structure.
A lot of beginners obsess over finding patterns. Better traders obsess over whether the trade still makes sense after spreads, slippage, and account risk are applied.
Common Failure Modes and How to Avoid Them
A cup and handle doesn't fail because the pattern is fake. It usually fails because one side of the market wasn't finished. Buyers tried to break resistance, but there wasn't enough follow-through.

StockCharts makes an important point by implication. The pattern is widely taught, but its reliability is rarely quantified in a way that answers a trader's practical question across markets and costs. That's why it often works better as a risk-management setup than as a guaranteed prediction tool, as discussed in StockCharts ChartSchool on the cup with handle.
Failure mode one, weak breakout participation
A breakout that drifts above resistance without conviction often snaps back into the handle. On FX and CFD charts, this is especially common during thin sessions or around levels that attract short-term profit taking.
What helps:
Wait for a proper close
Don't react to the first poke through resistance.Check whether the candle expands with intent
If the breakout looks hesitant, you don't need to force the trade.
Failure mode two, a handle that shows too much damage
A deep handle means the market had every chance to stay near the highs and couldn't do it. Traders often keep calling it a cup and handle because the cup itself still looks fine.
The handle is where many good-looking setups get disqualified.
- If the handle becomes disorderly, step back.
- If price loses the upper structure repeatedly, the breakout level becomes less meaningful.
- If the pattern stretches and stretches, momentum may already be gone.
Good cup and handle charts usually feel organized. Failing ones often need too much explanation.
Failure mode three, bad context
Even a clean chart can underperform in poor conditions. If the broader tape is unstable, continuation trades become harder to hold. The setup may still trigger, but the follow-through can fade fast.
This matters in crypto and indices in particular. A strong pattern inside a weak broader environment often behaves more like a scalp than a swing.
A simple defense checklist
Before you take the trade, ask:
- Is the handle still shallow and controlled?
- Did the breakout clear resistance cleanly?
- Can I define invalidation without widening the stop emotionally?
- Would I still take this trade if I had to explain it to a risk manager in one minute?
If the answer to that last one is no, skip it.
Trading Cup and Handle Charts with Prop Firm Rules
A cup and handle setup can look excellent and still be the wrong trade for a funded account. The issue isn't only chart quality. It's whether the setup fits strict daily loss and drawdown rules.
That changes how you trade.
Start with the loss limit, not the pattern
On a prop-style account, the first calculation is never “How much can I make?” It's “How much am I allowed to lose if the handle low fails?”
For example, MyFundedCapital describes a flat 5% daily loss limit and up to 10% maximum drawdown across its programs in the firm overview provided above. Those limits force a more professional process:
Pick the invalidation first
Your stop belongs below the handle low or at another structure level that clearly breaks the setup.Size down to fit the rulebook
If the stop is wide, the position must get smaller.Avoid stacking correlated cup and handle trades
Three similar breakouts in highly related markets can behave like one oversized bet.
A practical way to think about FX, crypto, and CFDs
The same pattern can behave differently depending on the instrument.
| Market | What tends to matter most |
|---|---|
| FX | Session timing, breakout follow-through, and whether momentum survives after the initial push |
| Crypto | Volatility around the breakout and whether the handle stays orderly before expansion |
| Index CFDs | Broader market tone and whether resistance breaks during active participation |
This is why prop traders need a filter beyond chart shape. A valid pattern in a dead session or unstable macro backdrop may still be a poor use of risk.
How disciplined traders adapt
Good prop traders usually make three adjustments:
They pass on borderline structures
If the handle is too deep or the breakout candle is weak, they move on.They reduce size when volatility expands
The pattern may still be valid, but the stop distance can punish oversizing.They think in account damage, not trade ideas
One failed breakout shouldn't put the day in danger.
On a funded account, survival is part of the edge. A clean setup with small controlled risk is worth more than a perfect-looking pattern traded too large.
If you're comparing evaluation models and risk frameworks, review the details of a prop firm challenge before you build your execution rules around any single setup. The pattern has to fit the account, not the other way around.
Frequently Asked Questions About the Cup and Handle
What is the best timeframe for cup and handle charts
The pattern can appear on intraday, daily, and weekly charts. In practice, many traders find higher timeframes easier to read because there's less noise and the structure is more obvious. On lower timeframes, breakouts can be less reliable and require tighter execution.
Do cup and handle charts work in Forex, crypto, and indices
Yes. The pattern reflects market behavior, not one specific asset class. You'll see it on FX pairs, crypto pairs, stock indices, and individual equities. The main difference is execution. A clean breakout in one market may behave very differently in another because volatility, session activity, and liquidity conditions change.
What's the difference between a cup and handle and a rounding bottom
A rounding bottom is generally treated as a reversal structure after a decline. A cup and handle is a continuation setup that forms after an advance. The handle is the key distinction. Without that secondary consolidation near the highs, you're looking at a different structure.
Should you buy before the breakout
Usually, no. Pre-breakout entries can work, but they also expose you to the most common problem: the market never clears resistance. For most beginner and intermediate traders, waiting for confirmation is the cleaner approach.
Conclusion Start Trading with a Proven Edge
Cup and handle charts are useful because they force structure onto a trade. You get a prior trend, a recognizable consolidation, a breakout trigger, and a clear invalidation point. That's what makes the setup practical.
The edge doesn't come from spotting the shape first. It comes from rejecting weak versions, waiting for confirmation, and keeping risk small enough that a failed breakout doesn't damage the account. Trading always involves risk of loss, and no chart pattern guarantees returns. This article is educational only and not financial advice.
If you want to apply disciplined chart setups inside a professional evaluation model, explore MyFundedCapital to compare funding programs, account types, and challenge options that fit your trading style.